Automating Talos Installation on Proxmox with Packer and Terraform, Integrating Cilium and Longhorn

I recently migrated my home kubernetes cluster from K3s to Talos. While K3s was an excellent lightweight option for my home server, it required installing, hardening and maintaining a base operating system (Debian, in my case). As someone who frequently builds and destroys Kubernetes clusters - both intentionally and accidentally - my priority has always been to restore my services with minimal effort after a disaster. Talos, a minimalistic Linux distribution specifically designed for Kubernetes, tailored for automation, reliability and simplicity, seems to be a perfect fit for my needs. In this blog, I am documenting the steps I followed to install a six-node Talos cluster, serving as a future reference for myself and potentially helping others with similar projects.
Features
- Talos: Cluster operating system.
- Cilium: Networking and L2 load balancer.
- Ingress Nginx: Ingress controller.
- Longhorn: Distributed storage.
Prerequisites
- Proxmox VE cluster/standalone server.
- A linux VM which acts as a workstation/bastion. In this guide, we use Debian 11.
- Basic understanding of Linux, Containers and Kubernetes.
Prepare the workstation
- On your linux workstation install the tools required for this guide. Let us start off with Packer.
1
2
3
4

wget -O- https://apt.releases.hashicorp.com/gpg | sudo gpg --dearmor -o /usr/share/keyrings/hashicorp-archive-keyring.gpg
echo "deb [signed-by=/usr/share/keyrings/hashicorp-archive-keyring.gpg] https://apt.releases.hashicorp.com $(lsb_release -cs) main" | sudo tee /etc/apt/sources.list.d/hashicorp.list
sudo apt update && sudo apt install packer
packer -v
- Install Terraform
1
2
3

sudo apt update
sudo apt install terraform
terraform -v
- Install Talosctl
1
2

curl -sL https://talos.dev/install | sh
talosctl version --help
- Install Talhelper
1
2

curl https://i.jpillora.com/budimanjojo/talhelper! | sudo bash
talhelper -v
- Install Kubectl
1
2
3

curl -LO "https://dl.k8s.io/release/$(curl -L -s https://dl.k8s.io/release/stable.txt)/bin/linux/amd64/kubectl"
sudo install -o root -g root -m 0755 kubectl /usr/local/bin/kubectl
kubectl version --client
- Install Sops
1
2
3
4

curl -LO https://github.com/getsops/sops/releases/download/v3.8.1/sops-v3.8.1.linux.amd64
mv sops-v3.8.1.linux.amd64 /usr/local/bin/sops
chmod +x /usr/local/bin/sops
sops -v
- Install Age
1
2

sudo apt install age
age -version
- Install Cilium CLI
1
2
3
4
5
6
7

CILIUM_CLI_VERSION=$(curl -s https://raw.githubusercontent.com/cilium/cilium-cli/main/stable.txt)
CLI_ARCH=amd64
if [ "$(uname -m)" = "aarch64" ]; then CLI_ARCH=arm64; fi
curl -L --fail --remote-name-all https://github.com/cilium/cilium-cli/releases/download/${CILIUM_CLI_VERSION}/cilium-linux-${CLI_ARCH}.tar.gz{,.sha256sum}
sha256sum --check cilium-linux-${CLI_ARCH}.tar.gz.sha256sum
sudo tar xzvfC cilium-linux-${CLI_ARCH}.tar.gz /usr/local/bin
rm cilium-linux-${CLI_ARCH}.tar.gz{,.sha256sum}
- Clone my github repository c0depool-iac
1
2

cd $HOME
git clone https://github.com/c0depool/c0depool-iac.git
Create Talos VM template using Packer
- Generate an API token for Proxmox root user. Login to Proxmox web console using root user. Navigate to Datacenter → Permissions → API Tokens → Add. Select
rootas the user, give a name for the token ID and click Add. Copy the token once displayed.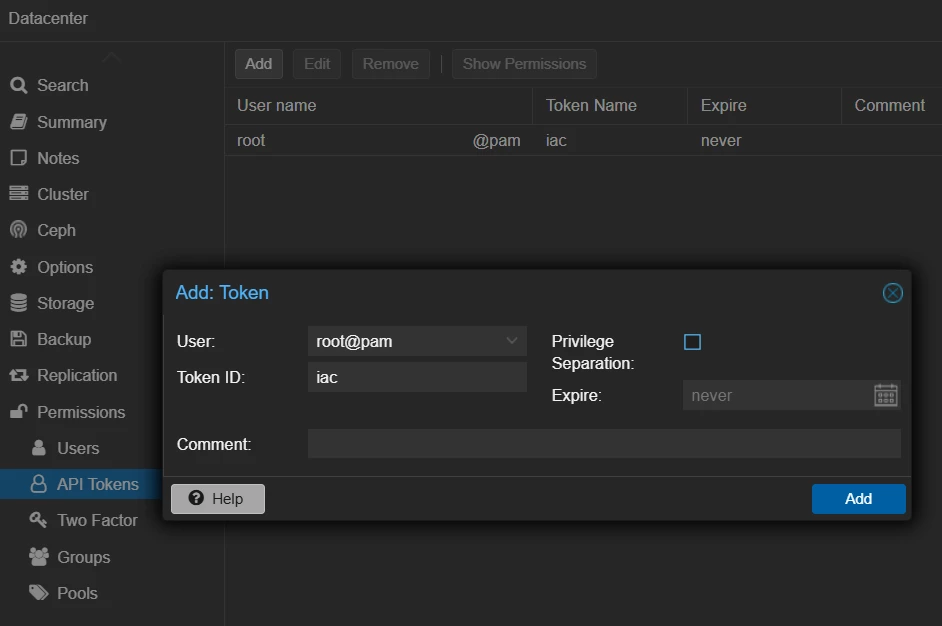
- Open a shell to the Proxmox node. From console select the Proxmox node → Shell.
- Download Arch Linux ISO, this is only used to copy Talos raw image.
1 2
cd /var/lib/vz/template/iso wget https://geo.mirror.pkgbuild.com/iso/2024.06.01/archlinux-2024.06.01-x86_64.iso - Create a copy of
c0depool-iac/packer/talos-packer/vars/secrets.pkvars.hcl.examplefile assecrets.pkvars.hcland update the Proxmox node details.1 2 3
cd $HOME/c0depool-iac/packer/talos-packer/ cp secrets.pkvars.hcl.example secrets.pkvars.hcl # Update the file secrets.pkvars.hcl
- Run Packer to build the Talos template.
1
2
3
4

cd $HOME/c0depool-iac/packer/talos-packer/
packer init -upgrade .
packer validate -var-file="vars/local.pkrvars.hcl" .
packer build -var-file="vars/local.pkrvars.hcl" .
After a few minutes, Packer will create a new VM template in Proxmox with ID
9700. We will use this template to create Talos VMs using Terraform.
Create Talos VMs using Terraform
- Create a copy of
c0depool-iac/terraform/c0depool-talos-cluster/credentials.auto.tfvars.examplefile ascredentails.auto.tfvarsand update the Proxmox node details.1 2 3
cd $HOME/c0depool-iac/terraform/c0depool-talos-cluster/ cp credentials.auto.tfvars.example credentails.auto.tfvars # Update the file credentails.auto.tfvars
- Open
c0depool-iac/terraform/c0depool-talos-cluster/terraform.tfvarsand add/remove the nodes according to your cluster requirements. By default I have 6 nodes: 3 masters and 3 workers. You should at least have one master and one worker. Here is an example configuration -1 2 3 4 5 6 7 8 9 10 11 12
clone_target = "talos-v1.10.4-cloud-init-template" # Target template, the one created by packer # Master Node configuration vm_master_start_ip = "192.168.0.170" # Starting IP of the nodes (will be incremented by node index) vm_master_nodes = { "0" = { vm_id = 200 # VM ID node_name = "talos-master-00" # VM hostname node_cpu_cores = "2" # CPU node_memory = 2048 # Memory node_disk = "32" # Disk in GB } } - Run Terraform to provision the servers.
1
2
3
4
5
6
7

cd $HOME/c0depool-iac/terraform/c0depool-talos-cluster/
# Initialize Terraform
terraform init
# Plan
terraform plan -out .tfplan
# Apply
terraform apply .tfplan
Once the provisioning is completed, Terraform will display the MAC Addresses of the nodes it created. Please note it down as we will be used it later for generating Talos configuration.
Generating Talos Configuration using Talhelper
- Update
c0depool-iac/talos/talconfig.yamlaccording to your needs, add MAC addresses of the Talos nodes underhardwareAddr. - Generate Talos secrets.
1
2

cd $HOME/c0depool-iac/talos
talhelper gensecret > talsecret.sops.yaml
- Create Age secret key.
1
2

mkdir -p $HOME/.config/sops/age/
age-keygen -o $HOME/.config/sops/age/keys.txt
- In the
c0depool-iac/talosdirectory, create a.sops.yamlwith below content.1 2 3 4
--- creation_rules: - age: >- <age-public-key> ## get this in the keys.txt file from previous step
- Encrypt Talos secrets with Age and Sops.
1
2

cd $HOME/c0depool-iac/talos
sops -e -i talsecret.sops.yaml
- Generate Talos configuration
1
2

cd $HOME/c0depool-iac/talos
talhelper genconfig
Configuration for each Talos node will be generated in
clusterconfigdirectory.
Bootsrap Talos
- Apply the corresponding configuration for each of your node from
c0depool-iac/talos/clusterconfigdirectory.1 2 3 4 5
# For master node(s) cd $HOME/c0depool-iac/talos/ talosctl apply-config --insecure --nodes <master-node ip> --file clusterconfig/<master-config>.yaml # For worker(s) talosctl apply-config --insecure --nodes <worker-node ip> --file clusterconfig/<worker-config>.yaml
- Wait for a few minutes for the nodes to reboot. Proceed with bootstrapping Talos.
1
2
3
4
5
6
7

cd $HOME/c0depool-iac/talos/
# Copy Talos config to $HOME/.talos/config to avoid using --talosconfig
mkdir -p $HOME/.talos
cp clusterconfig/talosconfig $HOME/.talos/config
# Run the bootstrap command
# Note: The bootstrap operation should only be called ONCE on a SINGLE control plane/master node (use any one if you have multiple master nodes).
talosctl bootstrap -n <master-node ip>
- Generate kubeconfig and save it to your home directory.
1
2

mkdir -p $HOME/.kube
talosctl -n <master-node ip> kubeconfig $HOME/.kube/config
- Check the status of your nodes. Since we use Cilium for container networking, the nodes might not be in “Ready” state to accept workloads. We can fix it later by installing Cilium.
1

kubectl get nodes
- Optional - if you need any custom extensions, upgrade the cluster using the factory image from factory.talos.dev.
1
2
3

talosctl upgrade --image factory.talos.dev/installer/<image schematic ID>:<talos version> --preserve --nodes "<list of master and worker nodes, comma separated>"
# Verify extensions for each node
talosctl get extensions --nodes <node IP>
Install Cilium and L2 Load Balancer
Cilium is an open source, production ready, cloud native networking solution for Kubernetes. Talos by default uses a lightweight networking plugin called Flannel, which works perfectly fine for many. I just wanted to experiment with a production ready and secure networking solution. Additionally, since this is a bare-metal installation, we can make use of Cilium’s L2 aware load balancer to expose the LoadBalancer, as an alternative to MetalLB.
- Install Cilium using the cli
1
2
3
4
5
6
7
8
9
10

cilium install \
  --helm-set=ipam.mode=kubernetes \
  --helm-set=kubeProxyReplacement=true \
  --helm-set=securityContext.capabilities.ciliumAgent="{CHOWN,KILL,NET_ADMIN,NET_RAW,IPC_LOCK,SYS_ADMIN,SYS_RESOURCE,DAC_OVERRIDE,FOWNER,SETGID,SETUID}" \
  --helm-set=securityContext.capabilities.cleanCiliumState="{NET_ADMIN,SYS_ADMIN,SYS_RESOURCE}" \
  --helm-set=cgroup.autoMount.enabled=false \
  --helm-set=cgroup.hostRoot=/sys/fs/cgroup \
  --helm-set=l2announcements.enabled=true \
  --helm-set=externalIPs.enabled=true \
  --helm-set=devices=eth+
- Verify your cluster. Now the nodes should be in “Ready” state.
1 2
kubectl get nodes kubectl get pods -A - Create CiliumLoadBalancerIPPool. For the pool
cidr, it is mandatory to select a /30 or wider range so that we get at least 2 IPs after reserving the first and last ones. For eg if we use192.168.0.100/30, we get 2 IPs192.168.0.101and192.168.0.102. I am planning to use only one LoadBalancer service for the ingress controller, so this works for me.1 2 3 4 5 6 7 8 9
cat <<EOF | kubectl apply -f - apiVersion: "cilium.io/v2alpha1" kind: CiliumLoadBalancerIPPool metadata: name: "cilium-lb-pool" spec: blocks: - cidr: "192.168.0.100/30" EOF
- Create CiliumL2AnnouncementPolicy.
1
2
3
4
5
6
7
8
9
10
11

cat <<EOF | kubectl apply -f -
apiVersion: "cilium.io/v2alpha1"
kind: CiliumL2AnnouncementPolicy
metadata:
  name: "cilium-l2-policy"
spec:
  interfaces:
  - eth0
  externalIPs: true
  loadBalancerIPs: true
EOF
- Install Ingress Nginx Controller with an annotation to use the Cilium L2 load balancer IP.
1
2
3
4
5
6
7
8
9
10

helm repo add ingress-nginx https://kubernetes.github.io/ingress-nginx
helm repo update
helm install ingress-nginx ingress-nginx/ingress-nginx \
  --namespace ingress-nginx \
  --create-namespace \
  --set controller.externalTrafficPolicy="Local" \
  --set controller.kind="DaemonSet" \
  --set controller.service.annotations."io.cilium/lb-ipam-ips"="192.168.0.101"
# Check if the LB service has the EXTERNAL-IP assigned
kubectl get svc ingress-nginx-controller -n ingress-nginx
Your ingress-nginx now has an external IP
192.168.0.101and all your ingress resources will be available via this IP.
Install Longhorn
Since we have multiple kubernetes nodes, it is essential to have a distributed storage solution. While there are many solutions available like Rook-Ceph, Mayastor etc., I was already using Longhorn with my K3s cluster where I have all my applications backed up. Luckily Longhorn now supports Talos. In the Talos configuration, I have added an extraMount for the longhorn volume. Let us install Longhorn and use the volume as our disk.
1
2
3
4
5
6
7

helm repo add longhorn https://charts.longhorn.io
helm repo update
helm install longhorn longhorn/longhorn \
  --namespace longhorn-system \
  --create-namespace \
  --version 1.6.2 \
  --set defaultSettings.defaultDataPath="/var/mnt/longhorn"
Congratulations, your Talos k8s cluster is now ready! Start deploying your workloads. ☸️