Authentik with Kubernetes: Forward Authentication using Ingress Nginx
Building my own home server and tinkering with it has always been a satisfying hobby, even if it means creating over-engineered solutions to problems that don’t really exist. Despite the occasional chaos, there’s something deeply rewarding about the process of self-hosting. As my user base grew from a single digit to a larger single digit, it became evident that centralized identity management was necessary. So, I finally decided to deploy Authentik to my Kubernetes cluster.
Authentik is an awesome open-source identity provider that supports protocols like OAuth2, SAML, LDAP and forward authentication. I was particularly interested in forward authentication because several of my services lacked built-in authentication support. By integrating Authentik with my ingress-nginx, I was hoping for a smooth single sign-on (SSO) experience, but it quickly became clear that my over-engineered setup had other plans. As always, I’m documenting the steps I took and the mistakes I made, so you don’t have to make the same ones (hopefully).
Prerequisites
- A kubernetes cluster, can be single or multi node, bare-metal or cloud. I used my Talos k8s v1.30.2 cluster for this guide.
- A working ingress-nginx as the ingress controller.
- A custom domain, public or locally resolved. Assumed as
yourdomain.comin this guide. - Helm.
- A linux VM which acts as a workstation/bastion. In this guide, we use Debian 11.
- Basic understanding of Linux, Containers and Kubernetes.
Installing Authentik using Helm
Let us start by installing Authentik using the helm chart by following the official documentation.
- Generate a 60 character random string for the Authentik
secure_key.1
openssl rand 60 | base64 -w 0
- Create a
values.yaml.1 2 3 4 5 6 7 8 9 10 11 12 13 14 15 16 17 18 19 20
authentik: secret_key: "<secure_key generated in step 1>" postgresql: password: "<a strong password for the db, same as postgresql.auth.password>" server: ingress: enabled: true ingressClassName: nginx hosts: - "auth.<your domain>" tls: - secretName: "<your TLS secret>" hosts: - "auth.<your domain>" postgresql: enabled: true auth: password: "<a strong password for the db>" redis: enabled: true
- Install the helm chart using the
values.yaml.1 2 3
helm repo add authentik https://charts.goauthentik.io helm repo update helm upgrade --install authentik authentik/authentik -f values.yaml --namespace authentik --create-namespace
- Check the pod status, everything should be in “Running” state.
1

kubectl get pods -n authentik - Once the installation is complete, access authentik at
https://auth.yourdomain.com/if/flow/initial-setup/and setup the password forakadminuser. - Navigate to System → Outpost Integrations, if there is no existing local
Kubernetes Service-Connection, create one by clicking onCreate. SelectKubernetes Service-Connection, give a name for the custer, enable local and click onFinish.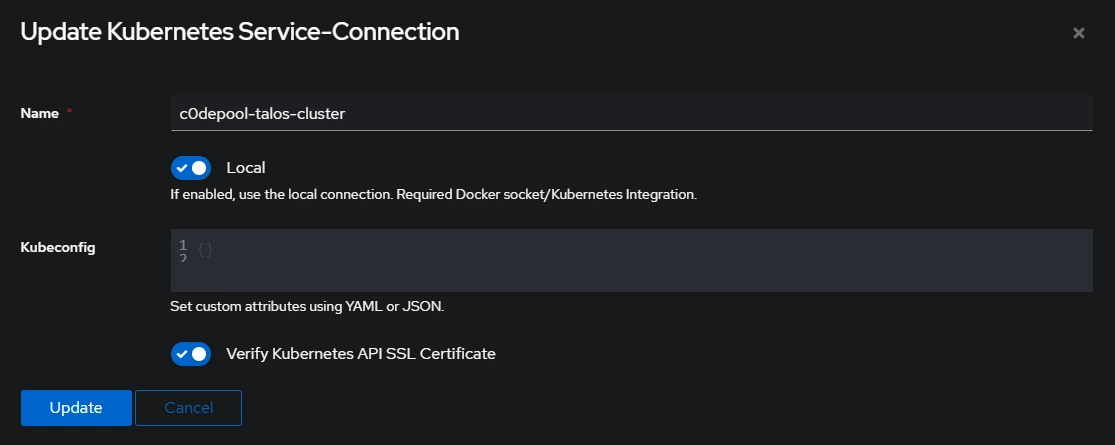
- Navigate to Applications → Outposts → Edit
authentik Embedded Outpostand update the integration filed with the kubernetes integration you have created in the previous step.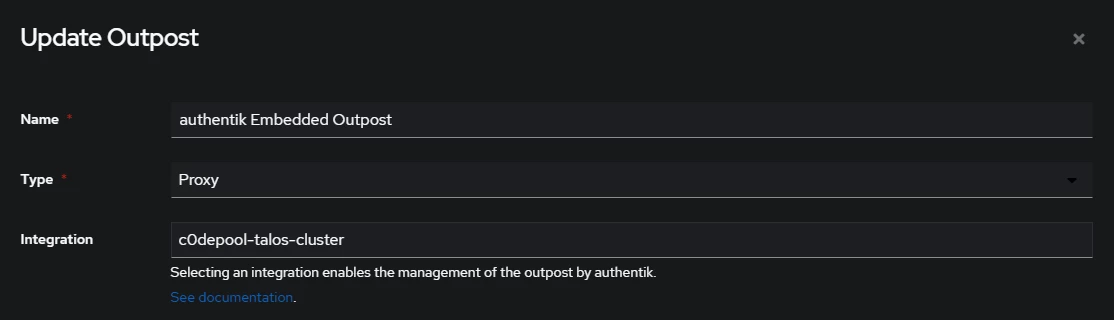
- Optionally, you can expand the
Advanced settingssection and update details of your cluster such asauthentik_host,kubernetes_ingress_class_name,kubernetes_ingress_secret_nameetc. Once done, click on update.
Setup Forward Authentication for Ingress Nginx
- For the purpose of this guide, let us create a simple hello-world pod with an ingress and enable authentication for it. Create below YAML manifest
hello-world.yamlfor the resources.1 2 3 4 5 6 7 8 9 10 11 12 13 14 15 16 17 18 19 20 21 22 23 24 25 26 27 28 29 30 31 32 33 34 35 36 37 38 39 40 41 42 43 44 45 46 47 48
apiVersion: v1 kind: Pod metadata: name: hello-world-pod labels: app: hello-world spec: containers: - name: hello-world-container image: crccheck/hello-world ports: - containerPort: 8000 --- apiVersion: v1 kind: Service metadata: name: hello-world-service spec: selector: app: hello-world ports: - protocol: TCP port: 80 targetPort: 8000 --- apiVersion: networking.k8s.io/v1 kind: Ingress metadata: name: hello-world-ingress spec: ingressClassName: nginx rules: # Update host with your domain name - host: hello.yourdomain.com http: paths: - path: / pathType: Prefix backend: service: name: hello-world-service port: number: 80 # Optionally configure TLS tls: - hosts: - hello.yourdomain.com secretName: your-tls-secret
- Apply the manifest on the default namespace.
1

kubectl apply -f hello-world.yaml - Verify that the ingress works. Use curl or open the url
https://hello.yourdomain.com(usehttp://if you haven’t configured TLS) in a browser.1 2 3 4 5 6 7 8 9 10 11 12 13 14 15
curl hello.yourdomain.com -L # Should return: # <pre> # Hello World # # # ## . # ## ## ## == # ## ## ## ## ## === # /""""""""""""""""\___/ === # ~~~ {~~ ~~~~ ~~~ ~~~~ ~~ ~ / ===- ~~~ # \______ o _,/ # \ \ _,' # `'--.._\..--'' # </pre>
- Open
https://auth.yourdomain.comand login asakadminuser. Navigate toAdmin interfaceby clicking on the button at top right corner. - Navigate to Applications → Providers → Create. Select
Proxy Provideras the provider type and click onNext. - Give a name for your provider, select the
Authorization flowfrom the dropdown (you can choose either one), selectForward auth (single application)and provide your URL at theExternal hostfield. Click onFinish.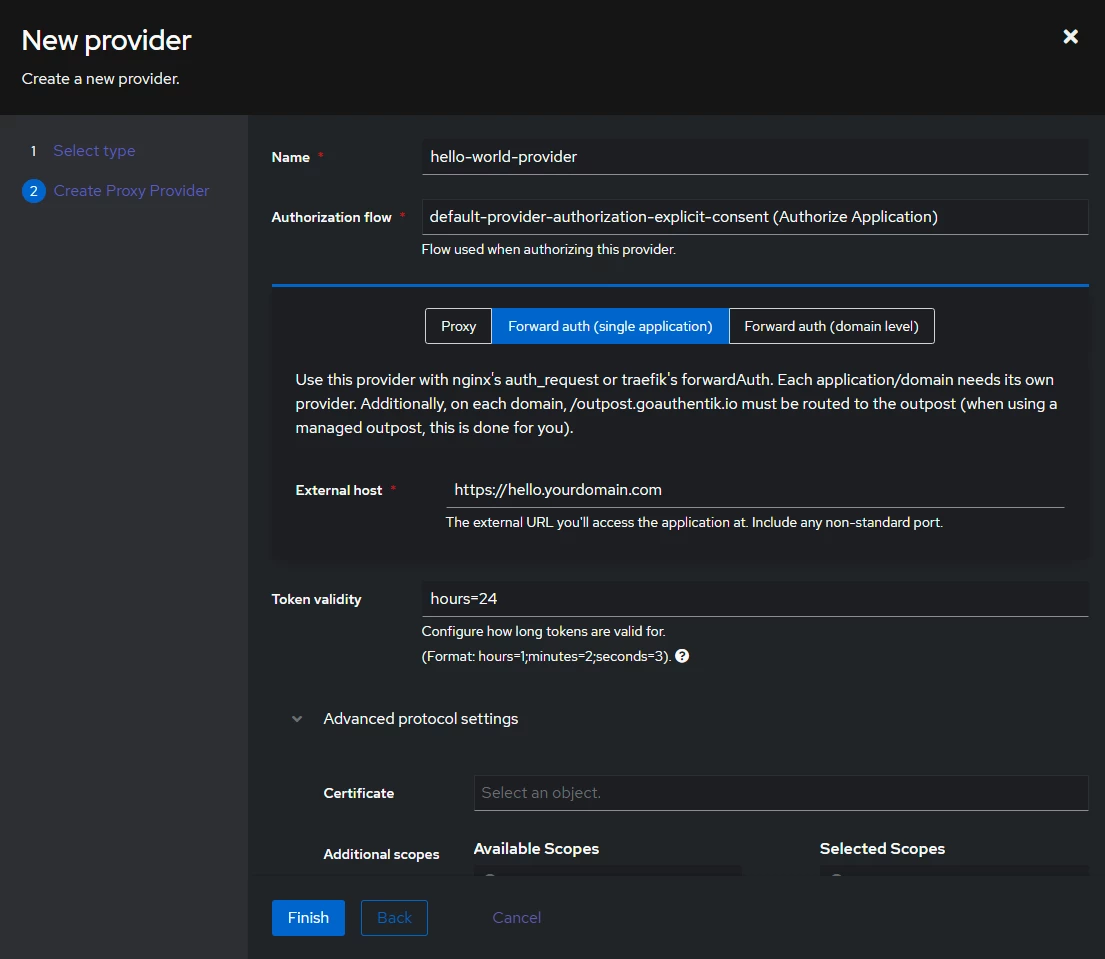
- Navigate to Applications → Applications → Create. Provide the application details, select the previously created
hello-world-provideras provider and click onCreate.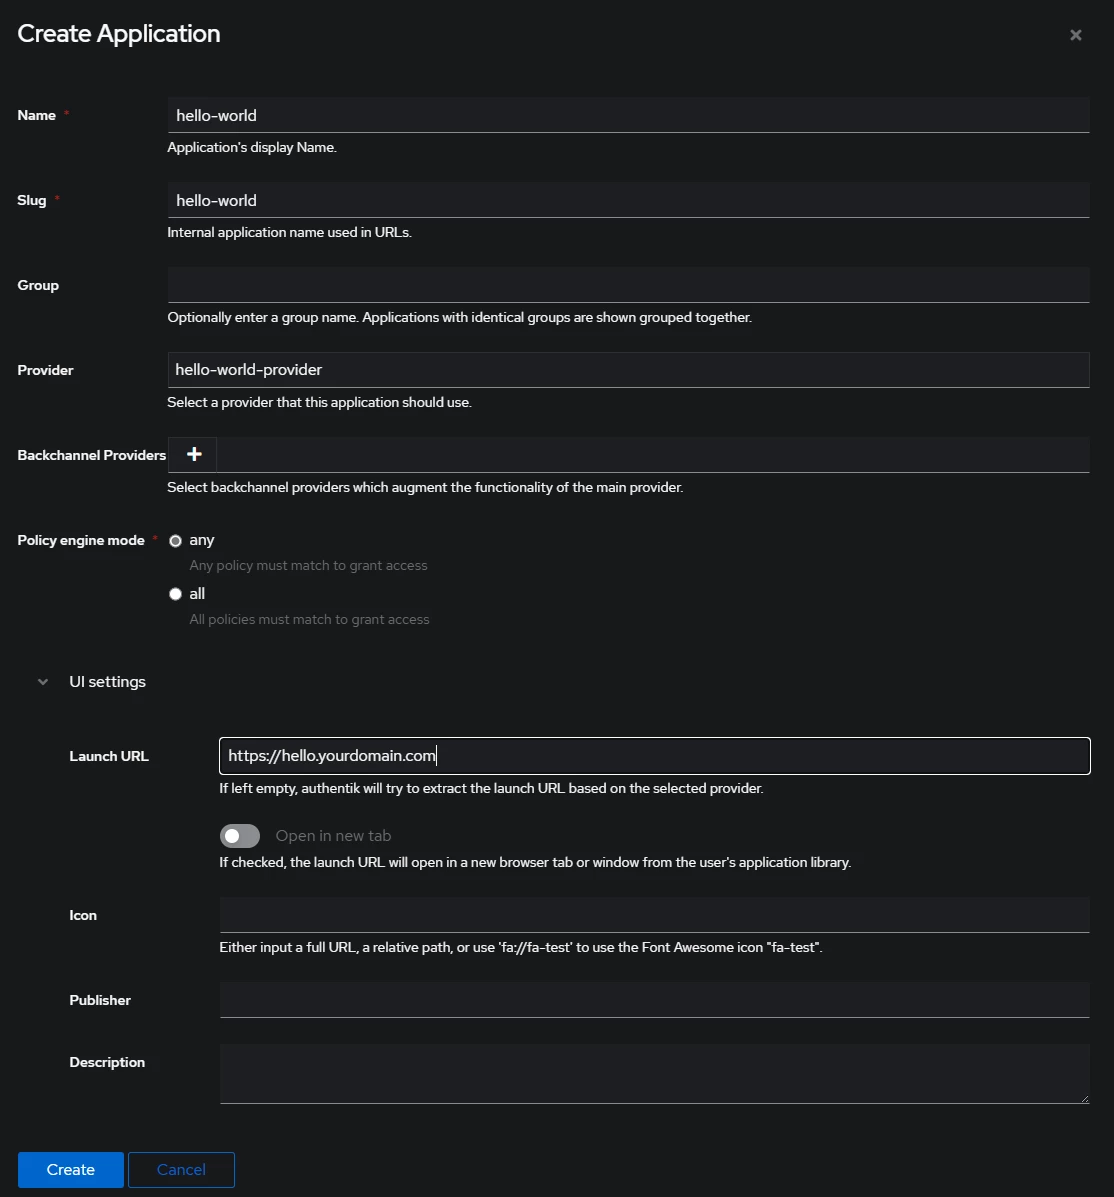
- Navigate to Applications → Outposts → Edit
authentik Embedded Outpostand add the hello-world application to the selected list of apps and clickUpdate.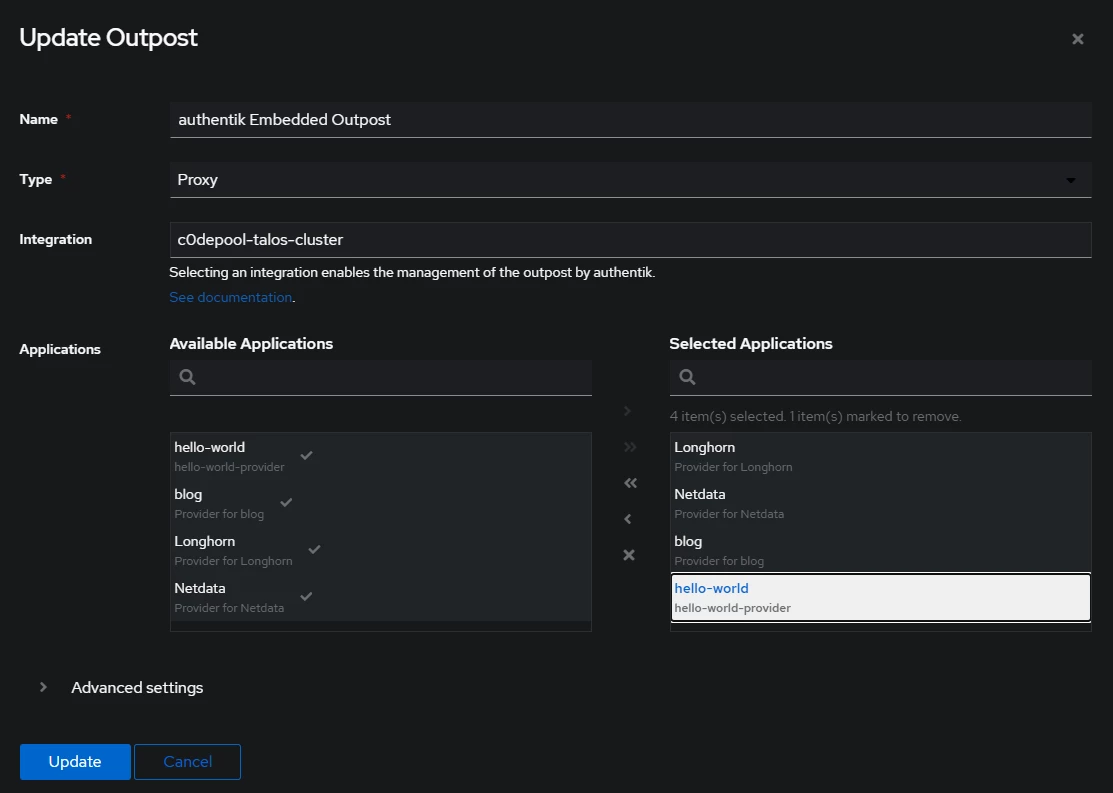
- Edit your ingress configuration in
hello-world.yamlto add the outpost details under metadata.annotations section.1 2 3 4 5 6 7 8 9 10 11 12 13
... metadata: name: hello-world-ingress annotations: nginx.ingress.kubernetes.io/auth-url: |- http://ak-outpost-authentik-embedded-outpost.authentik.svc.cluster.local:9000/outpost.goauthentik.io/auth/nginx nginx.ingress.kubernetes.io/auth-signin: |- https://hello.yourdomain.com/outpost.goauthentik.io/start?rd=$escaped_request_uri nginx.ingress.kubernetes.io/auth-response-headers: |- Set-Cookie,X-authentik-username,X-authentik-groups,X-authentik-email,X-authentik-name,X-authentik-uid nginx.ingress.kubernetes.io/auth-snippet: | proxy_set_header X-Forwarded-Host $http_host; ...
- Apply the configuration.
1

kubectl apply -f hello-world.yaml - Open the url
https://hello.yourdomain.comin a browser and you should now be presented with the Authentik login page!
Congratulations, your Authentik forward-proxy should be (hopefully) working now!
Troubleshooting
Unfortunately, setting up Authentik with Kubernetes and ingress-nginx can be tricky and you might run into few errors. The key is to understand the authentication request flow and observe the logs when you browse the page. Here are some tips to troubleshoot some of the common errors.
- Make sure you have allow-snippet-annotations enabled by setting
controller.allowSnippetAnnotationstotruein your helm values for the ingress-nginx installation. -
You might also want to accept critical risks on annotations-risk-level by setting
controller.config.annotations-risk-leveltoCriticalin your ingress-nginx helm values.Please be aware of the security implications while allowing snippet annotations in ingress-nginx.
- If you are getting
404 Not Found,502 Bad Gatewayor503 Service Temporarily Unavailablewhile browsing the application URL, check ingress-nginx-controller and authentik-server pod logs for any errors. Watch the live logs in each pod using--followwithkubectl logsand see what happens when you browse the page. - Enable debug logging in Authentik by setting up
authentik.log_leveltotracein the helm values. - You can also edit the ingress controller deployment to enable debug logging by setting
--v=5under- args. Check this for more info. - If you see errors like
ingress contains invalid paths: path /outpost.goauthentik.io cannot be used with pathType Prefixin your ingress-nginx-controller logs, disable strict-validate-path-type by settingcontroller.config.strict-validate-path-typetofalsein ingress-nginx helm values. This is needed due to this issue. if you don’t want Authentic to manage the outpost, you can manually create outpost ingresses. - If you use custom http error pages by setting
controller.config.custom-http-errorsin ingress-nginx, make sure it is not configured for401as Authentik needs to intercept these responses. Learnt that the hard way! 🙂 - If you use a local dns, make sure that your application URL is accessible from the nginx pod. You can test this by logging into the nginx container and running
curl.1 2 3 4
kubectl exec -n ingress-nginx -it <ingress-nginx-controller-pod-name> -- /bin/bash # Once you are in the container curl https://auth.yourdomain.com -Lk curl https://hello.yourdomain.com -Lk
If it is not resolving (curl says
Could not resolve host), you have to make sure DNS resolution is working from the cluster network. If you are using CoreDNS, check out this guide to add a custom DNS entry. - You can check out my ingress-nginx helm values and Authentik helm values in my GitHub repository.
I hope this guide helps save someone from losing their sanity while setting up Authentik! Peace. ✌️