Migrating Ingress NGINX to Gateway API - Envoy Gateway with Cilium as the L2 Load Balancer
Like all things in technology (and in life), retirement is inevitable. While building my Talos Kubernetes cluster a few years back, choosing Ingress NGINX was a no-brainer. For someone like me who started their career as a Middleware administrator, the Ingress annotations never felt scary. In fact, I liked the granular control they offered for customizing my Ingress resources. Definitely a questionable security choice – but for a home lab it worked really well.
Learning that the project was being retired in March 2026, in favour of the Gateway API, was genuinely disheartening. It will never be a seamless migration since the Gateway API takes an entirely different approach to routing requests to k8s workloads. But let’s look at the bright side – it’s an opportunity to learn and tinker with a new technology, which is why I personally run a home lab in the first place!
The Gateway API is the modern successor to Ingress, using a modular design that splits responsibilities between infrastructure owners (who manage the Gateways) and developers (who manage the Routes). Multiple self-managed and cloud-provider-managed implementations are available for the Gateway API – Istio, Envoy Gateway, Cilium, NGINX Gateway Fabric, Azure Application Gateway for Containers, and others. In this guide I’ll be using Envoy Gateway, but before we get into it, let’s look at a few of the self-managed implementations to help pick the right one.
Choosing a Gateway API Implementation
With around 20 Ingress resources of varying complexity, I needed a Gateway API implementation that could handle all of it while keeping things simple. My requirements:
- HTTPS backends with re-encryption
- Path blocking on specific apps
- Forward authentication
- TCP streams for exposing databases outside the cluster
Cilium was the obvious first stop since it was already running on the cluster as the networking plugin. However, it was missing a few things I needed – TCPRoute support and forward authentication.
NGINX Gateway Fabric was tempting due to my familiarity with NGINX. However, it also lacked forward authentication support.
Istio was an interesting option, but its Gateway API implementation trails behind its own native VirtualService and Gateway model – several advanced features aren’t exposed through the Gateway API surface yet.
Envoy Gateway checked all the boxes – TCPRoute and BackendTLSPolicy support, extensible auth, and advanced customization options via the EnvoyProxy CRD. The project has solid upstream momentum and an active community.
Here’s a rough comparison of the features I care about:
| Requirement | Gateway API Feature | Cilium Gateway | NGINX Gateway Fabric | Istio | Envoy Gateway |
|---|---|---|---|---|---|
| HTTPS backends | BackendTLSPolicy |
Yes | Yes | Yes | Yes |
| Path blocking |
HTTPRoute rules |
Yes | Yes | Yes | Yes |
| Forward auth / OIDC | SecurityPolicy |
No | No | Partial | Yes |
| TCP streams | TCPRoute |
No | Yes | Yes | Yes |
| Custom extensions |
EnvoyProxy / CRDs |
Limited | Limited | Limited (via Gateway API) | Yes |
This table reflects my assessment at the time of migration. Both Cilium Gateway and NGINX Gateway Fabric are actively developed – check the current docs before making your own call.
High-Level Design
Current Architecture

Proposed Architecture
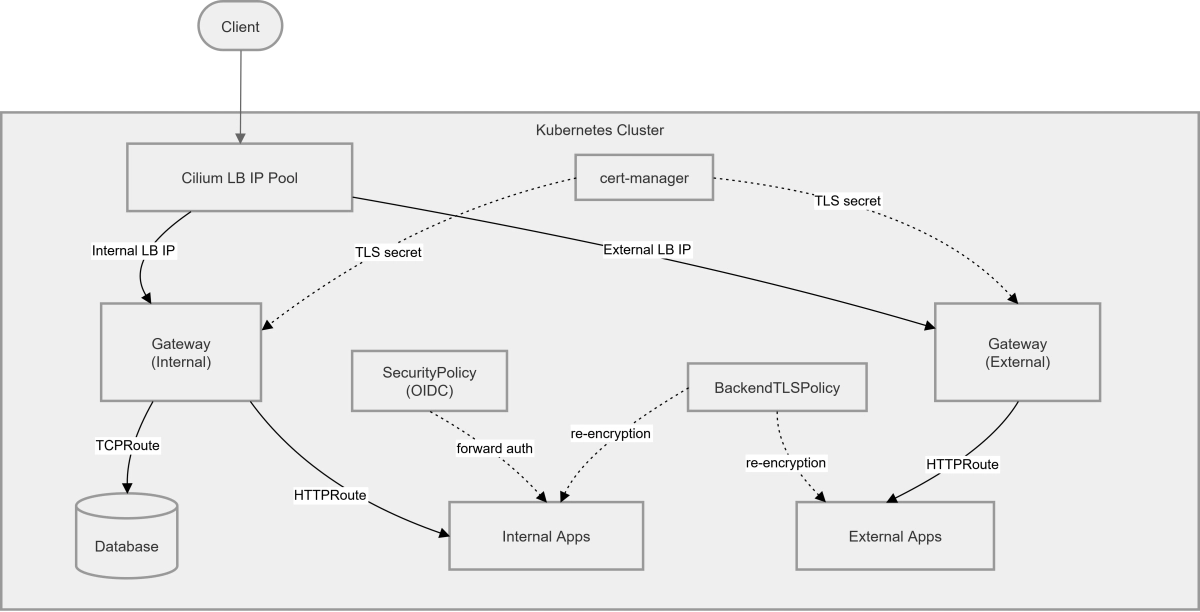
Yes, this definitely looks complex – it should make more sense as we start implementing.
Prerequisites
- A Kubernetes cluster (can be single-node or multi-node, bare metal or cloud). I used my Talos k8s v1.33.1 cluster for this guide. Check out this post to see how I built it.
- Cilium as your networking plugin (CNI).
- A Linux VM to use as a workstation or bastion host. In this guide, I’m using Debian 13 (trixie).
- Basic knowledge of Linux, containers, and Kubernetes.
Configuring Cilium for L2 Load Balancing
If you already have Cilium installed, you can enable L2 announcements by updating your Helm values. Upgrade your existing Cilium installation with:
1
2
3
4
5
6
7
8
9

helm upgrade cilium oci://quay.io/cilium/charts/cilium \
  --version 1.19.0 \
  --namespace kube-system \
  --set ipam.mode=kubernetes \
  --set kubeProxyReplacement=true \
  --set l2announcements.enabled=true \
  --set externalIPs.enabled=true \
  --set hubble.relay.enabled=true \
  --set hubble.ui.enabled=true
kubeProxyReplacement is required for L2 announcements to function – Cilium needs to own the kube-proxy responsibilities to handle ARP responses correctly.
This can also be done via the Cilium CLI using
cilium upgrade. See the official upgrade docs for details.
Creating the L2 Announcement Policy and IP Pool
If you don’t already have an L2 announcement policy and IP pool configured, create them now. These define which interface Cilium advertises on and which IP range it allocates from.
1
2
3
4
5
6
7
8
9
10
11
12
13
14
15
16
17
18
19

cat <<EOF | kubectl apply -f -
apiVersion: "cilium.io/v2alpha1"
kind: CiliumL2AnnouncementPolicy
metadata:
  name: my-l2-policy
spec:
  interfaces:
  - eth0
  externalIPs: true
  loadBalancerIPs: true
---
apiVersion: "cilium.io/v2"
kind: CiliumLoadBalancerIPPool
metadata:
  name: "my-lb-pool"
spec:
  blocks:
  - cidr: "192.168.0.195/30"
EOF
The /30 CIDR gives exactly two usable IPs which I use as my internal and external Gateways. Update the cidr block to match your own network range and however many IPs your setup requires.
Make sure the IP range you choose doesn’t overlap with any existing DHCP pool or statically assigned addresses on your network.
Installing Envoy Gateway
1
2
3
4

helm install eg oci://docker.io/envoyproxy/gateway-helm \
  --version v1.7.0 \
  --namespace envoy-gateway-system \
  --create-namespace
Once the installation is complete, verify the controller pod is running:
1

kubectl get pods -n envoy-gateway-system
Creating the GatewayClass
The GatewayClass is a cluster-wide resource that tells Envoy Gateway to manage any Gateway resource that references it. Create it with:
1
2
3
4
5
6
7
8

cat <<EOF | kubectl apply -f -
apiVersion: gateway.networking.k8s.io/v1
kind: GatewayClass
metadata:
  name: envoy-gateway
spec:
  controllerName: gateway.envoyproxy.io/gatewayclass-controller
EOF
Confirm it’s been accepted by the controller:
1
2
3

kubectl get gatewayclass envoy-gateway
# NAME            CONTROLLER                                      ACCEPTED   AGE
# envoy-gateway   gateway.envoyproxy.io/gatewayclass-controller   True       31d
You should see ACCEPTED: True in the output before proceeding.
Creating Your First Gateway
Before creating any Gateway resources, let’s spin up a simple demo workload to test the routing.
Demo Application
1
2
3
4
5
6
7
8
9
10
11
12
13
14
15
16
17
18
19
20
21
22
23
24
25
26
27
28
29
30
31
32
33
34
35

cat <<EOF | kubectl apply -f -
apiVersion: v1
kind: Namespace
metadata:
  name: demo
---
apiVersion: v1
kind: Pod
metadata:
  name: hello-world
  namespace: demo
  labels:
    app: hello-world
spec:
  containers:
    - name: hello-world
      image: hashicorp/http-echo:0.2.3
      args:
        - "-text=Hello from Envoy!"
      ports:
        - containerPort: 5678
---
apiVersion: v1
kind: Service
metadata:
  name: hello-world-svc
  namespace: demo
spec:
  selector:
    app: hello-world
  ports:
    - port: 80
      targetPort: 5678
  type: ClusterIP
EOF
Fixing externalTrafficPolicy for Cilium L2
Before creating the Gateway, there’s an important gotcha to address. Because Cilium L2 advertisements work at the ARP level, traffic arriving at the advertised IP will only reach the node currently announcing it. If your Envoy pods are spread across multiple nodes, you’ll get intermittent connectivity – requests silently failing depending on which node the packet lands on.
The fix is to set externalTrafficPolicy: Cluster on the LoadBalancer service that Envoy Gateway provisions (Thanks to this thread on r/kubernetes for the fix!). This ensures Cilium forwards the traffic correctly regardless of which node receives it. Fortunately, Envoy Gateway lets us patch the underlying service via the EnvoyProxy CRD rather than touching it directly.
Create the gateways namespace and the EnvoyProxy config:
1
2
3
4
5
6
7
8
9
10
11
12
13
14
15
16
17
18
19
20
21
22

cat <<EOF | kubectl apply -f -
apiVersion: v1
kind: Namespace
metadata:
  name: gateways
---
apiVersion: gateway.envoyproxy.io/v1alpha1
kind: EnvoyProxy
metadata:
  name: my-proxy-config
  namespace: gateways
spec:
  provider:
    type: Kubernetes
    kubernetes:
      envoyService:
        patch:
          type: StrategicMerge
          value:
            spec:
              externalTrafficPolicy: Cluster
EOF
Creating the Gateway
With the proxy config in place, create the Gateway. I’m using a wildcard hostname on the HTTPS listener since a single Gateway handles multiple apps, and a single wildcard cert covers them all. I am also requesting a specific IP from the Cilium pool.
1
2
3
4
5
6
7
8
9
10
11
12
13
14
15
16
17
18
19
20
21
22
23
24
25
26
27
28
29
30
31
32
33
34
35

cat <<EOF | kubectl apply -f -
apiVersion: gateway.networking.k8s.io/v1
kind: Gateway
metadata:
  name: my-gateway
  namespace: gateways
spec:
  infrastructure:
    annotations:
      "lbipam.cilium.io/ips": "192.168.0.193"  # Request a specific IP from the Cilium pool
    parametersRef:
      group: gateway.envoyproxy.io
      kind: EnvoyProxy
      name: my-proxy-config
  gatewayClassName: envoy-gateway
  listeners:
    - name: http
      port: 80
      protocol: HTTP
      allowedRoutes:
        namespaces:
          from: All
    - name: https
      port: 443
      protocol: HTTPS
      hostname: "*.example.com"
      tls:
        mode: Terminate
        certificateRefs:
          - kind: Secret
            name: my-tls-secret
      allowedRoutes:
        namespaces:
          from: All
EOF
Verify the Gateway comes up and gets its IP assigned:
1
2
3

kubectl get gateway -n gateways
# NAME                  CLASS           ADDRESS         PROGRAMMED   AGE
# my-gateway            envoy-gateway   192.168.0.193   True         31d
You should see the assigned address under ADDRESS and PROGRAMMED: True before moving on. In my case, I just created two gateways for separating internal and external traffic.
To ensure that the externalTrafficPolicy we set in the previous step is correct – try:
1
2
3
4
5
6
7
8

# Find your LoadBalancer service
kubectl get svc -n envoy-gateway-system | grep LoadBalancer
# envoy-gateways-my-gateway-9fbebd10   LoadBalancer   10.15.127.25   192.168.0.193   80:31033/TCP,443:30131/TCP,3306:32621/TCP          23d

# Verify externalTrafficPolicy is set to cluster
kubectl describe svc envoy-gateways-my-gateway-9fbebd10 -n envoy-gateway-system | grep "Traffic Policy"
# External Traffic Policy:  Cluster
# Internal Traffic Policy:  Cluster
HTTP to HTTPS Redirect
Optionally create a catch-all redirect route on the HTTP listener to redirect all HTTP traffic to the HTTPS listener:
1
2
3
4
5
6
7
8
9
10
11
12
13
14
15
16
17
18

cat <<EOF | kubectl apply -f -
apiVersion: gateway.networking.k8s.io/v1
kind: HTTPRoute
metadata:
  name: http-to-https-redirect
  namespace: gateways
spec:
  parentRefs:
    - name: my-gateway
      namespace: gateways
      sectionName: http
  rules:
    - filters:
        - type: RequestRedirect
          requestRedirect:
            scheme: https
            statusCode: 301
EOF
Routing Traffic to the Demo App
With the Gateway up, create an HTTPRoute in the demo namespace pointing at the demo service:
1
2
3
4
5
6
7
8
9
10
11
12
13
14
15
16
17
18
19
20
21
22

cat <<EOF | kubectl apply -f -
apiVersion: gateway.networking.k8s.io/v1
kind: HTTPRoute
metadata:
  name: hello-world-route
  namespace: demo
spec:
  parentRefs:
    - name: my-gateway
      namespace: gateways
      sectionName: https
  hostnames:
    - hellodemo.example.com
  rules:
    - matches:
        - path:
            type: PathPrefix
            value: /
      backendRefs:
        - name: hello-world-svc
          port: 80
EOF
Testing
1

curl -k -v --resolve hellodemo.example.com:443:192.168.0.193 https://hellodemo.example.com # Where 192.168.0.193 is the IP assigned to the gateway
You should get back:
1

Hello from Envoy!
Migrating Existing Ingress Resources
Third-Party Helm Charts
If your apps are deployed via third-party Helm charts, check the chart’s values first – many popular charts already support HTTPRoute natively. It’s often just a simple switch in your values.yaml:
1
2
3
4
5
6
7
8
9
10
11
12
13
14
15
16

# Before
ingress:
  enabled: true
  className: nginx

# After
ingress:
  enabled: false
httproute:
  enabled: true
  hostnames:
    - app.example.com
  parentRefs:
    - name: my-gateway
      namespace: gateways
      sectionName: https
Check the chart’s documentation for the exact field names – some charts have added dedicated HTTPRoute sections alongside the legacy ingress block.
ingress2gateway
For custom Ingress resources, the ingress2gateway tool from kubernetes-sigs can generate HTTPRoute manifests directly from your existing Ingress resources. It won’t cover every annotation (more on that below), but it handles the boilerplate to get you started.
Download the latest binary from the releases page and run it against your cluster:
1
2
3
4
5
6

# Download and extract (replace VERSION with the latest release)
curl -LO https://github.com/kubernetes-sigs/ingress2gateway/releases/download/<VERSION>/ingress2gateway_Linux_x86_64.tar.gz
tar -xzf ingress2gateway_Linux_x86_64.tar.gz

# Convert all Ingress resources in a namespace
./ingress2gateway print --providers ingress-nginx --namespace demo
The output is a set of Gateways and HTTPRoute manifests you can review, modify, and apply.
HTTPS Backends
For apps that serve traffic over HTTPS internally (re-encryption rather than termination at the gateway), the equivalent of the old nginx.ingress.kubernetes.io/backend-protocol: "HTTPS" annotation is a BackendTLSPolicy.
1
2
3
4
5
6
7
8
9
10
11
12
13
14
15
16
17
18

cat <<EOF | kubectl apply -f -
apiVersion: gateway.networking.k8s.io/v1alpha3
kind: BackendTLSPolicy
metadata:
  name: my-app-backend-tls
  namespace: demo
spec:
  targetRefs:
    - group: ""
      kind: Service
      name: my-app-svc
  validation:
    caCertificateRefs:
      - group: ""
        kind: ConfigMap
        name: my-app-ca-cert
    hostname: my-app.internal
EOF
The BackendTLSPolicy attaches to the Service directly. Your HTTPRoute stays the same – the policy handles the re-encryption transparently.
The CA cert needs to be present as a
ConfigMapin the same namespace as theService. If you’re using cert-manager with an internal CA, you can export the CA cert and create theConfigMapfrom it.
Path Blocking
The old nginx.ingress.kubernetes.io/server-snippet annotation for blocking specific paths is replaced by match rules directly in the HTTPRoute. There are two approaches depending on what you want to do – redirect the request to a different path, or return a direct error response via HTTPRouteFilter.
1
2
3
4
5
6
7
8
9
10
11
12
13
14
15
16
17
18
19
20
21
22
23
24
25
26
27
28
29
30
31
32
33
34
35
36
37
38
39
40
41
42
43
44
45
46
47
48
49
50
51
52
53
54
55
56
57
58
59

cat <<EOF | kubectl apply -f -
apiVersion: gateway.networking.k8s.io/v1
kind: HTTPRoute
metadata:
  name: my-app-route
  namespace: demo
spec:
  parentRefs:
    - name: my-gateway
      namespace: gateways
      sectionName: https
  hostnames:
    - myapp.example.com
  rules:
    # Redirect /admin back to / with a 301
    - matches:
        - path:
            type: PathPrefix
            value: /admin
      filters:
        - type: RequestRedirect
          requestRedirect:
            statusCode: 301
            path:
              type: ReplaceFullPath
              replaceFullPath: /
    # Return a 403 directly for /superadmin via HTTPRouteFilter
    - matches:
        - path:
            type: PathPrefix
            value: /superadmin
      filters:
        - type: ExtensionRef
          extensionRef:
            group: gateway.envoyproxy.io
            kind: HTTPRouteFilter
            name: forbidden-filter
    # Catch-all rule for legitimate traffic
    - matches:
        - path:
            type: PathPrefix
            value: /
      backendRefs:
        - name: my-app-svc
          port: 80
---
apiVersion: gateway.envoyproxy.io/v1alpha1
kind: HTTPRouteFilter
metadata:
  name: forbidden-filter
  namespace: demo
spec:
  directResponse:
    contentType: text/plain
    statusCode: 403
    body:
      type: Inline
      inline: "Oops! Your request is forbidden."
EOF
The HTTPRouteFilter with directResponse is an Envoy Gateway extension – it’s not part of the core Gateway API spec, which is why it’s referenced via ExtensionRef rather than inline in the rule. Rule order matters here; the blocking rules are evaluated top-down, so always place them above the catch-all.
TCP Streams
The equivalent of Ingress NGINX’s TCP stream ConfigMap is a TCPRoute. The Gateway needs a dedicated TCP listener on the port you want to expose. Update your gateway with an additional listener:
1
2
3
4
5
6
7
8
9
10
11
12
13
14
15

...
  listeners:
    - name: mariadb
      protocol: TCP
      port: 3306
      allowedRoutes:
        kinds:
          - kind: TCPRoute
        namespaces:
          # Allow only from databases namespace
          from: Selector
          selector:
            matchLabels:
              kubernetes.io/metadata.name: databases
...
Then create the TCPRoute to forward traffic to your database service:
1
2
3
4
5
6
7
8
9
10
11
12
13
14
15
16
17

cat <<EOF | kubectl apply -f -
apiVersion: gateway.networking.k8s.io/v1alpha2
kind: TCPRoute
metadata:
  name: mariadb
  namespace: databases
spec:
  parentRefs:
    - name: my-gateway
      namespace: gateways
      sectionName: mariadb
  rules:
    - backendRefs:
        # Backend SVC name and port
        - name: mariadb-cluster
          port: 3306
EOF
Troubleshooting
Gateway API introduces more components than a single Ingress controller, making troubleshooting more complex when issues arise. Here are some useful commands for debugging:
Useful Commands
1
2
3
4
5
6
7
8
9
10
11
12
13
14

# Check Gateway status and assigned IP
kubectl describe gateway my-gateway -n gateways

# Check HTTPRoute status and whether it has been accepted by the Gateway
kubectl describe httproute hello-world-route -n demo

# Check TCPRoute status
kubectl describe tcproute mariadb -n demo

# Check Envoy Gateway controller logs
kubectl logs -n envoy-gateway-system deployment/envoy-gateway -f

# Check the Envoy proxy pod logs (data plane)
kubectl logs -n envoy-gateway-system -l gateway.envoyproxy.io/owning-gateway-name=my-gateway -f
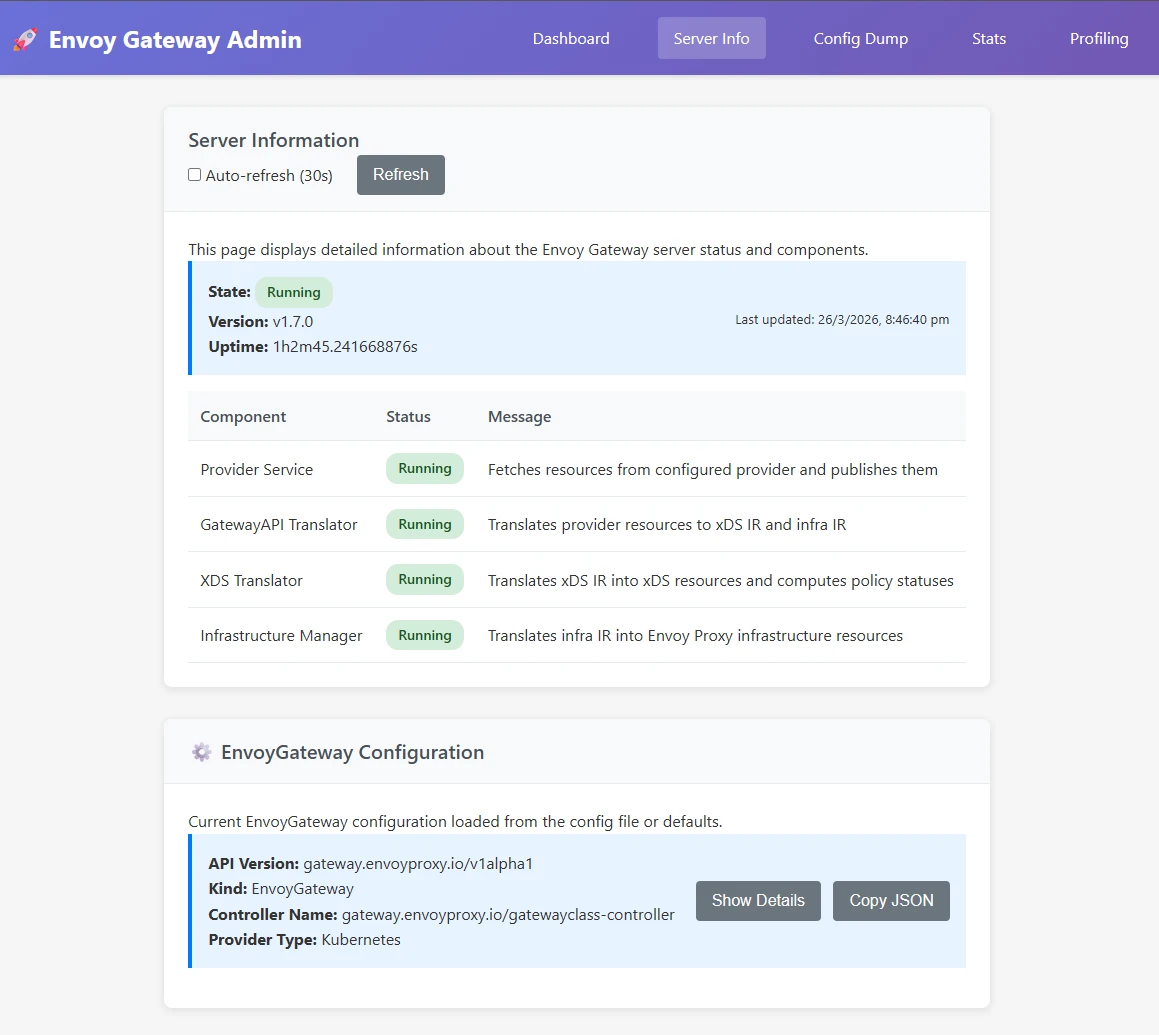
Admin Console
Envoy Gateway ships with an admin console that you can use to view the stats, metrics, and config dumps. It is useful for verifying that gateways and routes are being picked up correctly by the Envoy data plane.
1
2

# Access the Envoy admin console
kubectl port-forward -n envoy-gateway-system deployment/envoy-gateway --address 0.0.0.0 19000:19000
Once the port-forward is running, open http://localhost:19000 in your browser.
Restarting Things
And of course, the restart of shame/fame 😄 – especially after making changes to Cilium config or if the Gateway isn’t getting an IP assigned.
1
2
3
4
5
6
7
8
9

# Restart Cilium
kubectl -n kube-system rollout restart deployment/cilium-operator
kubectl -n kube-system rollout restart ds/cilium

# Restart Envoy Gateway controller
kubectl rollout restart -n envoy-gateway-system deployment/envoy-gateway

# Restart the Envoy proxy deployment for a specific Gateway
kubectl rollout restart -n envoy-gateway-system deployment/envoy-gateways-my-gateway-ed6cc5f5
Additionally, please have a look at the official Envoy Gateway troubleshooting docs for more information on advanced troubleshooting.
Conclusion
Migrating from Ingress NGINX to Envoy Gateway took more than a weekend; I replaced a single DaemonSet and some annotations with a GatewayClass, two Gateways, an EnvoyProxy, a handful of HTTPRoutes, TCPRoutes, BackendTLSPolicies, SecurityPolicies, and HTTPRouteFilters. There is definitely a resource overhead, but it shouldn’t affect me since I don’t monitor it 😄 – or, maybe I should implement full-stack observability and make it even worse (idea for next blog post!).
In all seriousness, the learning was genuinely worth it – and when Ingress NGINX is fully retired and everyone else is scrambling, I’ll be sitting here with my beautifully over-engineered Gateway API setup, feeling very smug about it.
Hope you had fun migrating. Peace. ✌️